|
|
The Track window is used to put together the various component parts, known as streams, that make up the Track that is currently selected in the Storyboard area. A Track must include a video stream, which can be motion video or still pictures, and can also include audio, subpicture and button highlight streams.
Up to eight audio streams and 32 subpicture streams are allowed in each Track. Using the Track window, you can add/delete and modify audio and subpicture streams, drag them on a timeline to position them in relation to the video, add/delete and modify chapter points, set language attributes, and perform other operations. Display of the Track window can be toggled on and off from the Tool Bar.
While the Track window has some similarities to non-linear video editing systems, it is not used for editing video or audio. Before a video clip can be used as a video stream in ReelDVD, it must already be encoded into a file in the MPEG-1 or MPEG-2 format, and should be edited to play back exactly as you want it to appear on the DVD (see Video Assets).
The central area of the Track window is reserved for horizontal bars which represent the streams in the Track. When a Track is first created by dragging a video or image file into the Storyboard area, a horizontal bar representing the video stream appears to the right of the Video label. The first part of this bar shows a thumbnail image of the video stream’s contents.
The duration of a Track is defined by the duration of the video stream. This duration is shown in a timeline running horizontally near the top of the Track window. The timecode values marking the timeline will vary depending on the timecode values associated with the video in the source MPEG file. The Zoom In and Zoom Out buttons to the left allow you change the scale of the timeline.
The green indicator on the timeline shows the current playback position in the Track. Dragging this indicator will change the video frame displayed in the Preview window. When a Track is played, however, it will always play from the beginning.
Above the timeline is the display area for chapter markers. By default, a Track contains a single chapter, indicated by the yellow triangle at the left of the display area. Clicking the New Chapter button at the lower left will create a new chapter that starts at the current location of the timeline indicator. A new chapter marker will appear in the display area at this location, and a vertical dashed line will appear across the streams in the Track window to show the chapter break.
To add an audio or subpicture stream to a Track, you can drag and drop the icon of the file that you want to add onto the icon of that Track in the Storyboard area. Or you can drop the file icon anywhere in the Track window. However, when working with multiple streams of a given type (audio or subpicture), it may be useful to control whether an added file becomes a particular stream position (1–8) of that stream type in that Track. By using the New Audio Stream or New Subpicture Stream button at the lower left, you can create empty streams in the Track window, then drop the file icon directly into the preferred stream. Subtitles can be typed in using the built-in subtitle editor by clicking the New Subtitle button.
When a stream is selected in the Track window, information about the stream’s attributes is displayed in a set of fields at the bottom of the Track window. The source file for the stream can be changed by clicking the browse button (marked “...”) next to the filepath field, which will bring up the Select File dialog box. The type of information displayed in the other fields varies depending on the type of stream (video, audio or subpicture).
Each Track can use only one video stream. A video stream can be motion video in the MPEG format, or it can be one or more still images. The minimum duration allowed for a motion video stream is 0.4 seconds.
When a motion video stream is selected in the Track window, the attribute fields displayed are labeled Video, Encoded, and Start.
Note: Encoders that do not handle timecode, such as the Matrox RT2000 and DigiSuite DTV, may put meaningless values in the timecode field.
Note: The in-point of the Start timecode must fall on the first frame of a Group of Pictures (GOP) in the MPEG stream, which occurs approximately once every half-second (there is no such limitation for the out-point). ReelDVD will automatically adjust an entered value to the start of the nearest GOP.
For the most part, ReelDVD handles still images the same way it handles motion video. The images are displayed in the video stream section of the Track window, and their duration defines the duration of the Track.
Still images are used in DVD for one of three different purposes: as backgrounds for still menus, in Still Shows and in Slide Shows. Of these, only Slide Shows can have audio accompaniment.
Both Still Shows and Slide Shows involve a series of still images appended together for continuous playback:
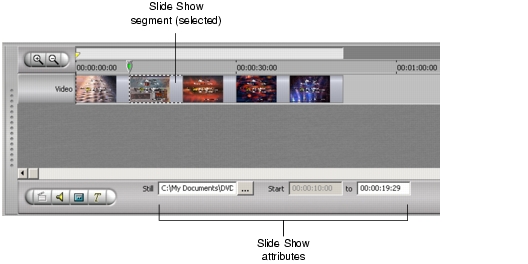
Like any other Tracks, Still Shows, Slide Shows and Menus are created by dropping a source file—in this case a still image (see Still Image Assets for supported file formats)—into the Storyboard area. A dialog box asks which type of Track you want to create. With the new Track open in the Track window, a horizontal bar representing the image’s duration appears in the video stream area. The first part of this bar shows a thumbnail of the image.
By default, each image in a Slide Show is set to play for 10 seconds. The duration of a selected image can be changed by dragging the edge of that image’s segment (the horizontal bar, including the thumbnail, that represents the image in the video stream area). Alternatively, you can enter new values in the Start attribute fields at the bottom right. Note that there are no Encoded attribute fields when a Track’s video stream is made up of still images rather than motion video.
Additional images are added to a Still Show or Slide Show by dragging source file icons from the Explorer window directly into the Track’s video stream. The images will appear in the video stream in the order that they are dropped, but once the images are in the stream, their order can be modified by dragging.
ReelDVD supports up to eight streams of audio per Track. The viewer can switch between these streams during playback by pressing the Audio key on the remote control.
Three different audio formats are commonly supported for use in DVD-Video: Dolby Digital (AC-3) and Linear PCM on both NTSC and PAL players, plus MPEG Audio on PAL players only (see Audio Assets).
To add an audio stream in the Track window, drag in the icon of the source file from the Explorer window (see Importing Audio for more information on importing audio into a ReelDVD project).
Keep the following in mind when working with audio streams:
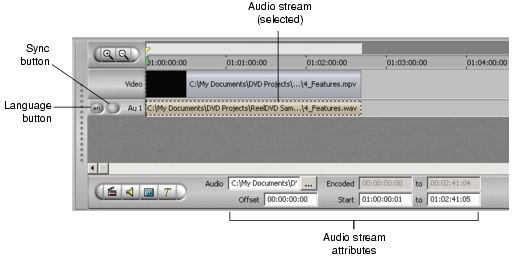
Dolby Digital audio files can contain timecode information that can be used to synchronize their audio to timecode information in the video stream. PCM and MPEG Audio files do not contain timecode information.
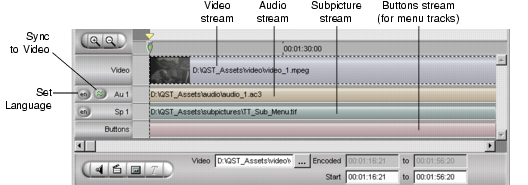
The Sync button to the immediate left of each audio stream in the Track window toggles on to allow the synchronization of audio file timecode to the timecode of the video stream.
Once an audio stream’s Sync button is set to off, either automatically or manually, it can only be reactivated if the existing audio data is removed from the stream, at which time the button can be turned on and new audio dropped into the stream.
When an audio stream is selected in the Track window, its attributes are displayed in the fields at bottom.
As an example of how the Offset and Start fields interact, consider a video stream with timecode starting at 01:00:00:00. If the audio stream has a Start value of 01:00:02:00, and an Offset of 00:00:05:00, audio will begin playing two seconds into the video, from a point in the audio data that is five seconds from the beginning of the original audio file.
DVD-Video players have the capability to automatically play back the appropriate audio stream of a Track based on language preference settings in the player’s setup menu. To make this feature work, each audio stream is assigned a language code.
The default language for audio streams is determined in the Project Settings dialog box (see Languages Tab). The language code of an individual stream can be changed by clicking the Language button found to the far left of each audio stream in the Track window. A Select Language dialog box appears with a list of available language codes (including “Not Specified”).
If you change the language code for an audio stream, an alert dialog will ask if you want to change the language code for that stream position in all Tracks in the project (this will have no effect on the language actually spoken in the audio stream). In other words, the language code for a given stream position (1–8) must be consistent from Track to Track throughout the project.
A subpicture is a 2-bit (four color) image that is overlaid on top of the program material (motion video or still image) in the video stream. Subpictures are used for menu button highlights and for subtitles.
On menus, subpictures are used in conjunction with a background to create the composite menu image seen by the viewer. When used for subtitles, on the other hand, subpictures are displayed in series, with multiple subpictures making up a subtitle stream. No more than one subtitle in the stream can be visible at any given time.
In ReelDVD, each subpicture is categorized as one of three specific types: Menu, Simple and Infinite.
When a subpicture stream is first created in the Track window, the type of the first subpicture added will always default to Menu. If a new subpicture is subsequently added to that subpicture stream, the type of the original subpicture changes to Infinite, and the type of the new picture defaults to Simple.
When a subpicture is selected in the Track window, its attributes are displayed in the attribute fields in the lower right corner.
ReelDVD supports up to 32 streams of subtitles per Track. As with audio streams, subtitle streams are assigned a default language code set in the Project Settings dialog box (see Languages Tab). Based on the language preference settings in the setup menu of a viewer’s player, the player will auto-select the appropriate subtitle stream during playback. The viewer can also switch between subtitle streams during playback by using the Subtitle and Subtitle On/Off keys on the remote control.
The language of an individual stream can be changed in the Track window by clicking the Language button found to the far left of each subpicture stream in the Track window. If you change the language code, an alert dialog will ask if you want to change the language code for that subpicture stream position in all Tracks in the project (this will have no effect on the language that was actually used in the subpicture images). In other words, the language code for a given subpicture stream position (1–32) must be consistent from Track to Track throughout the project.
Both menu subpictures and subtitles can be prepared as image files and then brought into a ReelDVD project (see Subpicture Assets and Subtitle Assets for information on preparing subpictures and subtitles). To add a subpicture in the Track window, drag in the icon of the source image file from the Explorer window.
If you use a higher-numbered subpicture stream while a lower-numbered subpicture stream is empty, you will get an error message when you try to create a disc image for your project. In other words, you must use stream 1 if there is only a single subpicture stream, and streams 1 and 2 if there are only two streams.
Subtitles (but not menu subpictures) can be created directly within ReelDVD using the built-in subtitle generator. Clicking the New Subtitle button at the lower left of the Track window will bring up the Create Subtitle dialog box, allowing you to type in the text and to specify subtitle parameters such as font, size, location, and start and stop times (see Create Subtitle Dialog). Both the text and the parameter settings can subsequently be modified at any time.
Whenever a subpicture stream is present, ReelDVD automatically creates a button highlight stream as well. The button highlight stream in the Track window will appear empty (gray) until buttons for the Track are created in the Preview window, after which it will appear as a colored bar. Because button highlight streams have no attributes, no attribute fields are displayed at the bottom of the Track window when the button highlight stream is selected.
The button highlight stream contains both the hotspot definitions and the commands for on-screen buttons.
See Creating Menu Buttons for information on creating buttons.
|
Sonic Solutions/ Voice: 415.893.8000 Fax: 415.893.8008 info@sonic.com |